I'm now blogging over a Flawed Yet Functional!
Hop on over!
Sep 19, 2011
Aug 10, 2011
Picture Frame Collage
I've started collecting cheap frames to do a frame collage above the couch in our family room. I'm trying to narrow down my ideas.
I'm a pretty clean-cut kinda girl. So while I like looking at ones like this. I think its a little too messy for me.
I'm really drawn to black and white. I like this one. I'd probably go with less frames and more sizes of frames.
In contrast, I really like white frames too. I also truly love Young House Love. I read them everyday. I admit it.
This one speaks to me as well. It is courtesy of Pottery Barn. I'm thinking of how I could wrap a frame in burlap or maybe wrap a mat in burlap. I like the texture and variation is gives the collage.
Empty frame collages. They look lovely in the pictures. I love the colors, textures, and shapes that people put together. I'm not sold on the idea for my house. Like I said, I'm a clean lines kind of girl. I think this is just too ornate for me. If you can call painted, empty frames ornate.
That's as far as my ideas have formed. Have you done a collage? What types of frames did you put together? How did you decide what to put in the frames?
Aug 9, 2011
The Word on Spray Painting Hardware
I made a cryptic message at the end of the Front Door Reveal post about things not being as good as they seem. I'm here to inform you all that spray paint is not quite as awesome as you might think.
I've been contemplating spray painting hardware for some time. I asked my dad and husband their thoughts on the subject, and both advised against it. They both thought that spray painted items could not withstand daily use.
I continued to ruminate on the subject for several months, unconvinced.
Do you know how AWESOME it would be to paint all of the brassy-gold knobs in my house a lovely oil-rubbed bronze? Not only would it give my house an instant update, it would be super cheap. One can of my beloved spray paint is $7.28 at Home Depot. One interior door knob is $17.50. One set for our front door is a whopping $149.99. These are on the cheap side. This update gets expensive quick, fast, and in a hurry.
So you see why I was so enamored by the idea of spray paint?
I spent under $20 on the spray paint for the handles and hinges on those two doors, and I have plenty of paint left over for a few more.
I did read this post that said something silly about letting the paint cure for three days. Three days??? Who has that kind of time?
I didn't. So I put them on after 36 hours. Bad idea.
Time was not our only issue. We may have been able to pull it off had I tried to label which screws go with which hinges which go in which order on which door. :)
Let's just say I had only managed to separate the hardware by door: front vs. garage. I left my darling husband with six hinges, 24+ screws, and a sets of door knobs for each door and said, "Please put the doors back together, honey!"
Bad wife of the century.
We have one extra screw and two missing screws from two different hinges. The one screw left over does not fit into either said hole. Oops. Very bad wife.
Let's just say the doors didn't slide back on the hinges like you might think.
Dan is a beast though, and he did manage to get both doors back on (the second door took a little help from our wonderful neighbor, Ethan). It was a mighty hard, mighty sweaty job. No A/C, bum ankle, and a weakling wife who messed up all the screws. Sorry again, honey.
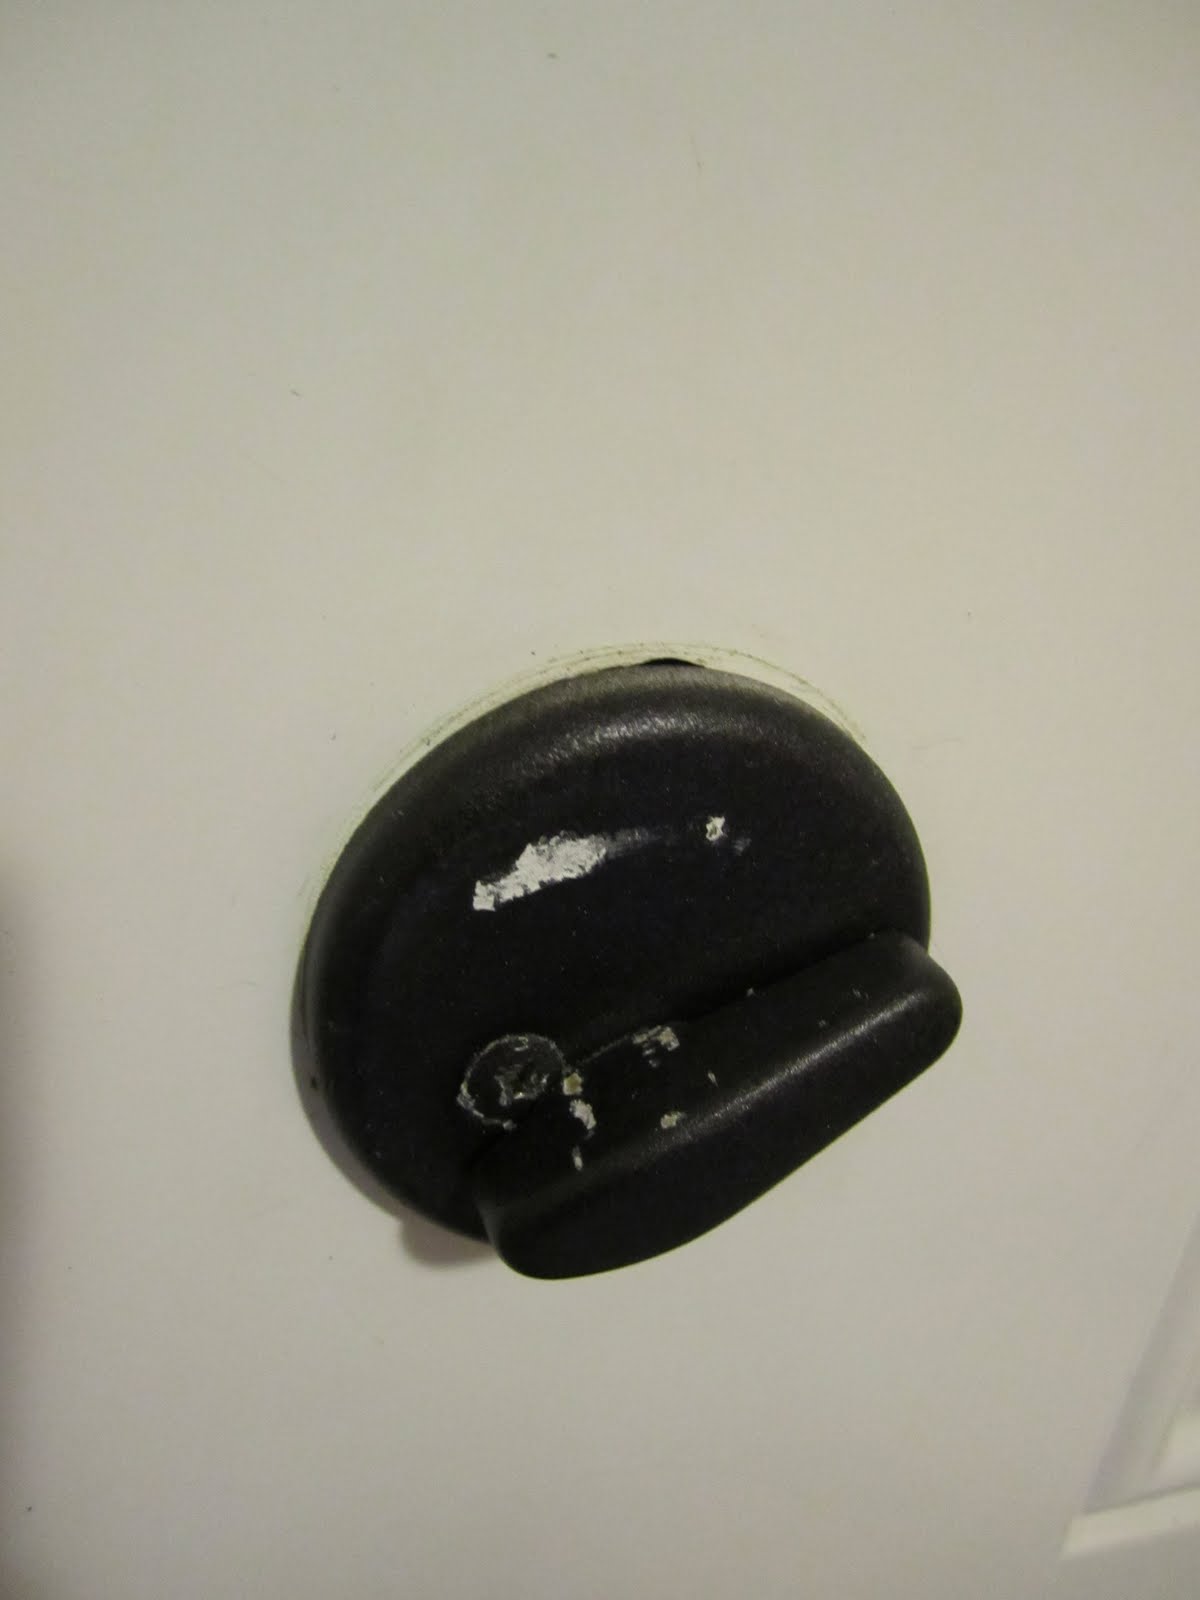
So the hinges got really scraped up. Yep, they look like death. I'm thinking of how I can fix those. I might give them a quick coat while still on the door. Just to gloss things over...

The dead bolt is the other issue. I didn't think about how much depth the paint was going to add. Now the paint is too thick so it scrapes every time you lock/unlock. Oops again.

Back to the drawing board.
For the time being, the doors are functional so lovely hardware will stay. We are debating what to do next.
I was very sad when I realized how bad this was turning out. However, it was an experiment in the first place. We (Dan included!) agreed to give the spray paint a go as a cheap fix before we purchase new hardware.
Hindsight says if I had labeled things better and let it cure for 3 days we might have been ok. Save the deadbolt, maybe not him.
From a distance, things look ok...

I've been contemplating spray painting hardware for some time. I asked my dad and husband their thoughts on the subject, and both advised against it. They both thought that spray painted items could not withstand daily use.
I continued to ruminate on the subject for several months, unconvinced.
Do you know how AWESOME it would be to paint all of the brassy-gold knobs in my house a lovely oil-rubbed bronze? Not only would it give my house an instant update, it would be super cheap. One can of my beloved spray paint is $7.28 at Home Depot. One interior door knob is $17.50. One set for our front door is a whopping $149.99. These are on the cheap side. This update gets expensive quick, fast, and in a hurry.
So you see why I was so enamored by the idea of spray paint?
I spent under $20 on the spray paint for the handles and hinges on those two doors, and I have plenty of paint left over for a few more.
I did read this post that said something silly about letting the paint cure for three days. Three days??? Who has that kind of time?
I didn't. So I put them on after 36 hours. Bad idea.
Time was not our only issue. We may have been able to pull it off had I tried to label which screws go with which hinges which go in which order on which door. :)
Let's just say I had only managed to separate the hardware by door: front vs. garage. I left my darling husband with six hinges, 24+ screws, and a sets of door knobs for each door and said, "Please put the doors back together, honey!"
Bad wife of the century.
We have one extra screw and two missing screws from two different hinges. The one screw left over does not fit into either said hole. Oops. Very bad wife.
Let's just say the doors didn't slide back on the hinges like you might think.
Dan is a beast though, and he did manage to get both doors back on (the second door took a little help from our wonderful neighbor, Ethan). It was a mighty hard, mighty sweaty job. No A/C, bum ankle, and a weakling wife who messed up all the screws. Sorry again, honey.
So the hinges got really scraped up. Yep, they look like death. I'm thinking of how I can fix those. I might give them a quick coat while still on the door. Just to gloss things over...

The dead bolt is the other issue. I didn't think about how much depth the paint was going to add. Now the paint is too thick so it scrapes every time you lock/unlock. Oops again.
Back to the drawing board.
For the time being, the doors are functional so lovely hardware will stay. We are debating what to do next.
I was very sad when I realized how bad this was turning out. However, it was an experiment in the first place. We (Dan included!) agreed to give the spray paint a go as a cheap fix before we purchase new hardware.
Hindsight says if I had labeled things better and let it cure for 3 days we might have been ok. Save the deadbolt, maybe not him.
From a distance, things look ok...

Aug 8, 2011
Front Door Reveal
So remember my "during the day fix." I was pretty adamant it would be fixed by nightfall wouldn't you say?
I was so wrong.
Here's a glimpse at our front and garage doors. I felt like I was camping in my own house.


The noise from the outdoors was quite loud, and the fear of racoons invading our house was very real.
Note the boots beside the ottoman/coffee table. Remind anyone of our barricades against the tent door during family vacations? Ah, the memories... One time, I even tied the zipper pulls to side doors of the tent door together with an elastic hair tie. To keep the critters out, ya know?
Better safe than sorry, right?
On to the important stuff...the big reveal!
Here she is in all her glory!
Front Door:


Garage Door:

I used Behr Exterior Paint and Primer-in-one in Satin finish in Dragonfly tinted 50% darker. I really love the color. It so close to this picture, I could squeeze it!
To say I love, love, love it would be an understatement. Dan isn't sure it matches, but he said he's happy if I like it. I love that man!
Now for some before and afters. Bear with me, I do not have Photoshop nor do I know how to edit pictures. This is the best I could do in 5 minutes in Paint. :) I try to put my best foot forward here on this blog.


Doesn't it look great?
Garage Door:


Um...Yes...Love. Love. Love it!
Not all is as good as it seems, but that's another post for another day. Goodnight, all!
Aug 6, 2011
Front Door & Exterior Lights
I've been itching to paint our front door for sometime now. We have a standard steel door for both the garage door and the front door. The front door has several dents in it; however, replacing it was too expensive so I decided to give it a new coat of paint and call it good enough.
Enter choosing the color problems.
Dan and I don't quite see eye to eye on what color a door should be. There was nothing wrong in theory with our green front door. Besides being dirty and dented, the color blended well with the siding, roof, and landscaping.
It was just too safe.
On the other hand, our house is on the market, so I probably shouldn't get too crazy with the color choice. Eggplant, anyone?
So I brought home paint chip after paint chip. I must have gone to Home Depot to collect color swatches 5 or 6 times. I wish I'd taken a picture, I had quite the stack.
I was really drawn to something vibrant, like red.

Or turquoise, like this front door. Isn't that color to die for?? (Found here)

Dan didn't think so.
Enter sample paint. We finally narrowed our choices down to two colors: a light shade of green, still a nice earthy color and a light turquoise.

Both were nice in their own respect. I did like the green really I did. Dan and I both agreed that either was nice, but both needed to be darker. That sounded like a go-ahead with turquoise to me! So I went back to Home Depot for the bazillionth time in the last few weeks to get the blueish/turquoise on the left 50% darker.
Time-out there's MORE to the story! I forgot to mention our hardware. It sucks. It's bronze/gold. It's ugly. It's tarnished. It's peeling. It's just plain yucky.


We tried to replace it when we first bought the house. However, we couldn't find one to fit in the holes already in the door. Our friend said those kind of handles are adjustable so that they fit into pre-drilled doors. Maybe they are, but the four we bought wouldn't fit.
Anyways...I've been reading more and more about spray painting door handles. It's tricky because it is such a high traffic item that the paint can wear off. I landed on this post one day which gave me the courage to give it a try. I decided that since they were exterior hardware, I'd better dot all my i's and cross all my t's. So I sanded, cleaned, primed 2x, paint 2x, then clear top coat. Don't they look lovely?


Oh WAIT! There's one more aspect to this re-do. The lights! I wanted to try my fancy spray painting trick on our equally ugly gold/bronze light fixtures. However, we determined that it was too much work taping all the glass or trying to remove it. So we bought three new ones in an oil-rubbed bronze finish so all the exterior fixtures will match.
Before:


After:


I'll post the finish products soon! The doors and hardware are drying in the garage as I write this. We need to wait until at least 8:45pm to put the doors back up. The hardware should get 3 days of dry time, but let's face it, that's not going to happen.
I currently have bed sheets hung by straight pins keeping the bugs out of our house. Not a long term solution. Or even a one night solution. Those doors are going up tonight!
To be continued...
Subscribe to:
Posts (Atom)